Friday, October 28, 2011

Sumi-e Books


This sumi-e painting project took three class periods to paint and one to assemble. We read "Zen Shorts" and talked about how making art can relax you and is about making mistakes and trying again (very zen). We actually did some deep breathing "meditation" exercises which they actually seemed to enjoy!  


Once all of our painting were created (about 10-12 total on cheap brown craft paper) students cut and pasted them into an accordion book!


I love the uniqueness in each one, especially the different personalities the pandas seem to have.

Thursday, October 27, 2011

Teachable Moments :)


The month of October at BRE is the month of Japanese Art and Culture. I have Koi Fish, Gyotaku, Sumi, and Scrolls coming out of my ears! 


While preparing the paint for the K-1's cherry blossom tree scrolls I realized that I had a teachable moment on my hands. Along with looking like a sunny side up red fried egg, the paint trays also looked a lot like the Japanese flag. As a class we all took a moment and soaked in this fact before swirling the paint into a marbleized tornado of cherry blossom pink:) 

Tuesday, October 25, 2011

Cherry Blossom Scrolls (K-1)


This is a two day project for K-1. We first used found objects to stamp our cherry blossom trees. We used cardboard to create straight lines and rolled up scraps of bulletin board boarder to create the blossoms. 


On day two students will use oil pastels to create more variety and texture in their flowers. Two strips of red construction paper will be pasted on the top and bottom of their artwork, and a small piece of string will be attached to the top to complete the scroll. 


Monday, October 17, 2011

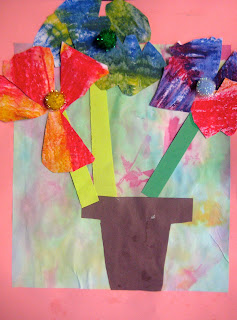
Eric Carle Flower Pots


2nd grade students created flower pots in the style of Eric Carle. Along the way students learned about primary color mixing, pattern making, and symmetry while further perfecting their tracing and cutting skills. 


First we learn about primary colors and how they can be mixed to create other colors. We used craypas to complete a simple "pizza pie" style color wheel so students could explore mixing on their own. Then each student received a sheet of drawing paper that was cut into thirds. Students then picked two of the three primary colors and filled the page with color. They then used their thumbs to smear the two colors together mixing the two. 


We then created symmetrical petal patterns out of square construction paper scraps. The patterns were then traced on the backs of our 1/3 page color mixing papers. Most could get five petals on each paper, but if the pattern was too big only three or four would fit. 


The day before flower pot assembly we used tissue papers dipped in water to create background paper. This only took about 20 min. total from demo. to drying rack so we used the rest of class to catch everyone up to the same point. Three flowers with five petals each. Using an envelope to store small petal pieces and petal patterns is highly recommended...


Each is unique and different! Love the personality that "springs" up from each one! Would be a great project for the spring time but it hits so many standards I just couldn't wait!

Tuesday, October 11, 2011

Elmer's Day Parade


Elmer has taken over our school!

K-1st grade (they are grouped together in my school) created their very own Elmer's. There were a lot of steps to this project but in the end I enjoy how they turned out. Each is unique in its own way. On day on and day two, after reading "Elmer" by David McKee we learned the basic geometric shapes needed to draw an elephant. We then worked step-by-step together drawing and coloring them in. Some K's took a while to catch on to drawing the shapes, which is to be expected, but I didn't want to hold back on my first project, especially since I still want to keep my 1st graders engaged. 

We then talked about how colors mix together to make other colors. As they layered tissue papers with glue water they explored the possibilites of color mixing.

The real test was drawing out elephants on the back sides of our beautiful paper and cutting them out. I was crossing my fingers and we had no causalities:) All trunks, legs, and tails were safe (with the help of tape in some cases).  

On the last day we talked about texture and created a ripped paper dirt floor on a blue sheet of paper. They were free to create a home for their elephants drawing trees, sun, watering holes, and animal friends with crayon. 


In the end I'm happy we did not use a tracer, which was a consideration of mine. I actually sut out a bunch of tracers just in case everything went to crazy town. I love how each is unique in its own special way, just like Elmer!

Monday, October 10, 2011

Introducing Japanese Culture

October is the month of Japanese Arts and Culture in the Bert Raney Elementary artroom. The librarian at BRE showed me this book after I had asked her for some Japanese introductory resources (my projector bulb went out so now I'm teaching without technology until the replacement bulb order comes in!) The story is written in Haiku and has great illustrations. An amazing resource for those of you planning on doing Japanese Units over the course of this school year. 

Friday, October 7, 2011

More Reefs:)


I'm in love with how all of these turned out. The trick to success I think is painting with tissue paper. The colors remain really vivid and the mixing is very controlled because of the limited number of tissues they can use to cover their picture (6 squares total and three have to be of the same color). The salt adds another special touch to make all the paintings really unique! 

Thursday, October 6, 2011

Watercolor Coral Reefs

As a class we first discussed what makes up a coral reef. Watching videos really helped get the visual across. We talked about the struggling state of some reefs and what is being done to prevent their extinction. (The movie "Finding Nemo" was a good resource to use when asking the question"what do you already know about coral reefs?")


Forst their sketched out our ideas on a 1/2 sheet handout. We drew what we saw from videos and also created "undiscovered" corals, plants, and fish to stretch their creativity.

Then students created a fina; pencil sketch on watercolor paper. This is where we talked about overlapping and how to use it in a drawing. I gave them a few tips.


Next step was to trace over all pencil lines very hard with a crayon. We then used tissue paper dipped in water to drag colors over our drawings, first in the sea and then over the coral. I sprinkled salt over their reefs right before being placed in the "coral garden" drying rack. The salt added a nice sea water texture to their final art works!

Student pencil sketch

After crayon, tissue paper water color, and salt. 


BRE in the NEWS!


Our pinwheels made the news, a full color article! YAY! 


Saturday, October 1, 2011

Lets Take A Trip: Google Maps


My 3rd Graders recently took a trip to Australia, and it was not sponsored by Oprah... Actually google made it all possible! Using goggle maps I chaperoned my students on a costal trip of eastern Australia and the Great Barrier Reef to supplement a coral gardening mixed media drawing lesson we are working on.


I displayed my computer screen onto the smart board and students were able to explore the region of the world we are learning about by "car" up close.  Some comments during the trip included "wow!", "is this a video game?", and "how much did this cost you?"


As you zoom in on goggle maps and find a place you want to visit you click your cursor on the little yellow figure above the "zoom in, zoom out" icons and drag it where you want to explore. Wherever there is blue highlight on a road is available for travel. A blue highlighted dot represent a photograph from that location on the globe.

You can travel from Versaille, France...

To a Greek escape without all those planes and ferry rides:)